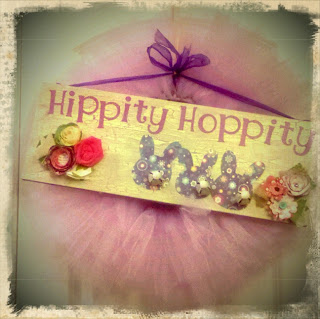
Glue "Hippity Hoppity" letters to board, along the top. (font: Alphalicious 2")
Glue Bunny to bottom center of board. (Doodlebugs cartridge, Border option of bunny, 4")
Modpodge over paper to secure.
Embellish each side of the board (to the right and left of bunny paper)
-Cut flowers by tracing template onto choice of paper and cutting. Then starting at the center, start wrapping the circle around until it resembles a flower. Glue at spots to secure shape.
-Fold circles of fabric, paper, cupcake liner, in half, then half again to form a triangle "leaf" embellishment.
-Embellish centers of flowers with twists of book page, or rhinestones or button. Some flowers are layered on top of each other.
-Use hot glue to secure embellishments to board.
-Paint three jingle bells (we used a larger than average size) white or cream. When dry, hot glue onto each bunny. Glue a pompom on top of each jingle bell.
-Cut the ribbon provided in half. Secure each length of ribbon to top of board with a flat thumb tack (one on each side.)
Wreath:
Cut two spools of tulle into equal lengths. (Unwind each spool around the cardboard template, about 14.5" long, once completely unwound, secure with rubberbands on each end. Then use scissors to cut the tulle at each end.) See this tutorial at Treasures for Tots for lots of pictures and easy explanations!
Tie each piece of tulle in one simple knot around 8" embroidery hoop.
Finished wreath alone:
Finished board:
And layered over wreath:
We had so much fun at our Craft Night, everyone came up with so many fun ideas! I wish more of my friends lived nearby so that they could come too! Here's some other boards from the night:
If you make a wreath, let us know and we'll share it on our facebook page! And if you have any questions, please feel free to ask!! We know those flowers could seem a little tricky, but they are totally do-able! And if you just want us to make it for you all handy-dandy, check out our Snobette etsy listing!
Linking here:
Sunday:
Monday:
http://craftomaniac.blogspot.com/, http://makingtheworldcuter.blogspot.com/, http://diyhshp.blogspot.com/, http://www.skiptomylou.org/, http://sumossweetstuff.blogspot.com/
Tuesday:
http://todayscreativeblog.net/, http://ladybug-blessings.com/, http://tipjunkie.com/, http://www.sugarbeecrafts.com/
Wednesday:
http://eisymorgan.blogspot.com/, http://www.paisleypassions.blogspot.com/, http://somedaycrafts.blogspot.com/, http://www.bluecricketdesign.net/, http://www.mybackyardeden.com/
Thursday:
http://www.momnivores-dilemma.com/, http://www.houseofhepworths.com/, http://nightowlcrafting.blogspot.com/
Friday:
http://www.whipperberry.com/, http://www.kojodesigns.blogspot.com/, http://www.thegirlcreative.com/,http://tidymom.net/, http://sassysites.blogspot.com/, http://shabbynest.blogspot.com/, http://tatertotsandjello.blogspot.com/, http://www.findingfabulousblog.com/
Saturday:


7 comments:
Gorgeous projects and thanks for the great tutorials!
Linking up from Tatertots & Jello
That is such a cute wreath! Thanks for stopping by!
I love it all! Great job!
Hey thanks for the tutorial on the flowers! I am making a wreath for a friend's baby shower this week and have been looking around at paper flowers to add. Thanks also for stopping by my blog and commenting on my napkin rings! I got all the supplies at Hobby Lobby. The rings were back with the grapevine wreaths.
Jen
Scissors & Spatulas
Great project. I was thinking about making one as well (since my business is all about tutus), but quite frankly I don't want to even SEE another tutu right now unless I have to LOL. I much prefer looking at your blog post. :) Thanks for sharing.
Sadie from http://www.randomosityblog.com
That sign is adorable! Thanks for the great tutorials!
I love your Hippity Hoppity wreath. It is SO cute! I also have some of that scrapbook paper you used on your wreath/sign! Thank you for sharing! I'm you're newest follower!
Post a Comment