 |
| cactus tea cup |
 |
| felt flower hair bow |
 |
| April Showers wall hanging |
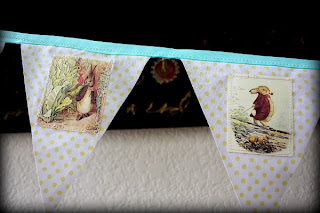
Melanie also made this fabulous vintage illustration (courtesy of Beatrix Potter) Easter bunting:
And exclusively for Holiday Snob, she produced this Mr. Bunny Free Motion Sewn wall art,
so without further ado, here's her tutorial!!
When I started making these images I used paper on paper and another
was fabric on fabric. I thought to get more variety I mixed it up and
did paper on fabric. Paper is so fun cause I had so much of it! A lot
more variety than my fabric selection. So that is how mr. Bunny came
about. Heres the know how...
Step 1: draw and design your image
Step2: for the next step, you'll need to make several separate parts
for stenciling. So what I did, I took my picture to the light box and
using heavy cardstock, I traced each separate body part I was going to
use for different paper or fabric. Before I cut them out I labeled
them so I would know what was the part and which was the front. Once
they're cut out it can get a little confusing.
Step 3: I then cut out each piece. I then figured out my color scheme
and started tracing. You want to make sure you trace on the back of
the paper. Also, when doing that, you need to make sure your stencil
is turned around. That way the front of the paper will match the right
side of he stenciled image. If that makes sense.
Step 4; once all the body parts are cut, I placed them how they should
fit (also added an oval for the background). Then I taped them just a
little to keep the image together while I sewed it.
Step 5: I stretch my fabric on an embroidery hoop and place my image
on the back (so it lays flat on the machine) after all taped, I used
my sewing pen ( with disappearing ink) and drew in designs like the
nose, eyes, and border. That way I can see exactly where to sew once I
get on the machine. (saves a little heart ache)
Step 6: Then I take off the needle and the "pressure foot ankle"
itself . That way I can fit the hoop under. Once under I put the ankle
and needle back in place. Then I put on my embroidery/ daring foot.
Make sure to change all settings necessary for free motion sewing such
as lowering your feed dogs and anything else depending on your
machine.
Step 7: start sewing! I went around each body part a few times, along
with the body. You can choose to do one continuous line without bring
your needle up for a different effect. I raised mine a few times to do
the eyes and nose parts separate.
Step 8: here's the image all done sewing wise and now flipped on the
embroidery hoop, but you can see I still need to trim off excess
fabric from the back.
Step 9: um.. That would be trim the excess fabric off the back. Make
sure the image is EXACTLY where you want it and pulled tight. once you
trim off the back it's almost impossible to change.
Pic 10 and 11 : Finished product! I left it like it is at this point
but In the past I've added embellishments such as buttons, brads,
ribbon, stamps or whatever tickles your fancy. Just have fun with it!
Thanks, Melanie!!
Dot and Glitta
Linking here:
Sunday:
Monday:
http://craftomaniac.blogspot.com/, http://makingtheworldcuter.blogspot.com/, http://diyhshp.blogspot.com/, http://www.skiptomylou.org/, http://sumossweetstuff.blogspot.com/
Tuesday:
http://todayscreativeblog.net/, http://ladybug-blessings.com/, http://tipjunkie.com/, http://www.sugarbeecrafts.com/
Wednesday:
http://eisymorgan.blogspot.com/, http://www.paisleypassions.blogspot.com/, http://somedaycrafts.blogspot.com/, http://www.bluecricketdesign.net/, http://www.mybackyardeden.com/, http://reasonstoskipthehousework.blogspot.com
Thursday:
http://www.momnivores-dilemma.com/, http://www.houseofhepworths.com/, http://nightowlcrafting.blogspot.com/
Friday:
http://www.whipperberry.com/, http://www.kojodesigns.blogspot.com/, http://www.thegirlcreative.com/,http://tidymom.net/, http://sassysites.blogspot.com/, http://shabbynest.blogspot.com/, http://tatertotsandjello.blogspot.com/, http://www.findingfabulousblog.com/
Saturday:


3 comments:
Looks awesome!
All her crafts are beautiful! I particularly like the vintage bunting. Thanks for sharing!
Hi and I'm so glad you stopped in so I could see your blog! I love your blog title!
Now this is an adorable little bunny and good tutorial. Wish my children were little again (not really) so I could make a vintage bunny bunting! :)
Be a sweetie and I hope you'll pop over to see me again sometimes.
Shelia ;)
Post a Comment