2.28.2011

Birthday time!

I've always thought of birthdays as your own personal holiday, but I guess it depends on how you celebrate them.

Mine have always been celebrated to the fullest extent...

To make a birthday special, you really just need the ones you love... But.  Dot would not be Dot if I didn't think you needed a lot more than that to make a great party!  If you know me at all, you know I do a little bit for a birthday...

But today's birthday post is about party hats:  I love a good party hat, and its a trend that's on the rise right now!  You practically can't go anywhere in the blogosphere without bumping your knees against one!

NieNie made party hats for her New Years Eve party:  (So it wasn't a birthday, but wouldn't it be cute for one??!!)


Jordan at Oh Happy Day has a template and DIY guide for making your own:

Silver Spoon Scraps sells these adorable party hats on her etsy shop, in fact she made two for us!


Made by SilverSpoonScraps
Dot recently went on a girl's trip to celebrate a friend's 30th birthday, and made her the hat on the bottom right of the picture.  It was in coral and turquoise, why oh why didn't I ever take a picture of it?

Photobucket

2.26.2011

Clever Clovers from Family Fun

Family Fun magazine has this fun recipe for St. Patricks Day that we thought 
would be fun to make with the kids!  Maybe to lure the leprechauns?


Ingredients
  • waxed paper
  • 3 yogurt covered mini pretzels
  • 1/4 teaspoon vegetable oil
  • 1/4 cup white chocolate chips
  • green icing
  • decorating sugar
Instructions
  1. To make a batch, cover a work surface with a sheet of waxed paper. For each clover, arrange three yogurt-covered mini pretzels and a pretzel section as shown.
  2. Combine 1/4 teaspoon vegetable oil with 1/4 cup white chocolate chips and melt them together in the microwave according to the chips' package directions. Dab the mixture between the pretzel pieces to adhere them. Let the chocolate harden.
  3. Working with one clover at a time, pipe the edges and stem with green icing (we used a #8 round piping tip), then quickly sprinkle it with decorating sugar (we used white, light green, and dark green).
Tips:
To save sugar, sprinkle each clover on a small piece of waxed paper. After you've covered a few treats, use the paper to funnel the extra sugar back into its jar.
Photobucket

2.24.2011

Craft Night, Loads of Glitter, and a Tutorial!

You may not know this, but we (Dot and Glitta) host a monthly craft night that is SO FUN.  If you don't get together with some fun girls for some crafting, you should.

Really.  

It's a little bit new, but its seeming to work best to provide a kit for our crafty ladies.  We tried just giving a supply list, but less people seemed to come that way.  So we started offering kits to purchase and thought we'd also provide a tutorial online.  We've also decided to make the kits available for purchase to our online readers as well.  So either email us, or buy some supplies and

get crafting!

This month's craft is this Shamrock Door Hanger (wreath, technically?):


Supplies:
About 8 ft of 16 gauge wire (we used 20 and it ended up being a little flimsy)
About 9 ft of a cheap ribbon for wrapping around the wire
About 75 large clothespins
Can of lime green spray paint
Green glitter (about 2 oz worth)
Spray Adhesive
25 yard spool of 6" green tulle

Embellishment Supplies:
Green buttons
Book pages
White cupcake wrappers,
green fabric
burlap
wire

This kit is available to purchase (with the embellishment supplies) for $25, minus the spray paint and spray adhesive, just email us with an order at holidaysnob@gmail.com

Step 1: Spray paint your clothespins.  I kept them all together the way they were packaged because I was  painting literally thousands of clothespins.  It covers pretty well, but if you're a perfectionist, spread them out.


Step 2: Spray a small group of clothespins with spray adhesive, then immediately glitter.  Then spray with a second coat of adhesive, which works pretty well to seal the glitter on.  (Better than not spraying, but Dot's house was still covered in green glitter after craft night!)


Note:  You won't be able to salvage leftover glitter because of the second coat of adhesive (even if you were to move the clothespins before spraying, you'd lose more glitter from your clothespins).

Stacks of glittered clothespins in bundles of 75:


Step 3:  Shape wire into clothespin shape.  Sorry, there's no pattern, but it's just 3 circles and a stem, right? Ours is about 20" wide and 16" tall.

Step 4:  Wrap shamrock frame in ribbon.  This helps bulk up the frame and the clothespins adhere.  Start with glue-gunning the ribbon to itself around the stem and then occasionally as you go to keep the ribbon in place.  This step may work better if you cut the ribbon between the stem and then between each leaf.  Otherwise it's hard to secure it strictly in shape.


Step 5:  Cut Tulle into 14" lengths (approximately).  We used this method from Treasures For Tots, that's really for making tutus.  But works well when you just need a bunch of equal lengths of tulle.

Step 6:  Knot the tulle around your frame.  The tulle sticks out best if you knot it like this:


Leave enough room between each knot to be able to use your clothespins.  We didn't put tulle around the stem, just clothespins.  Here's one finished product:

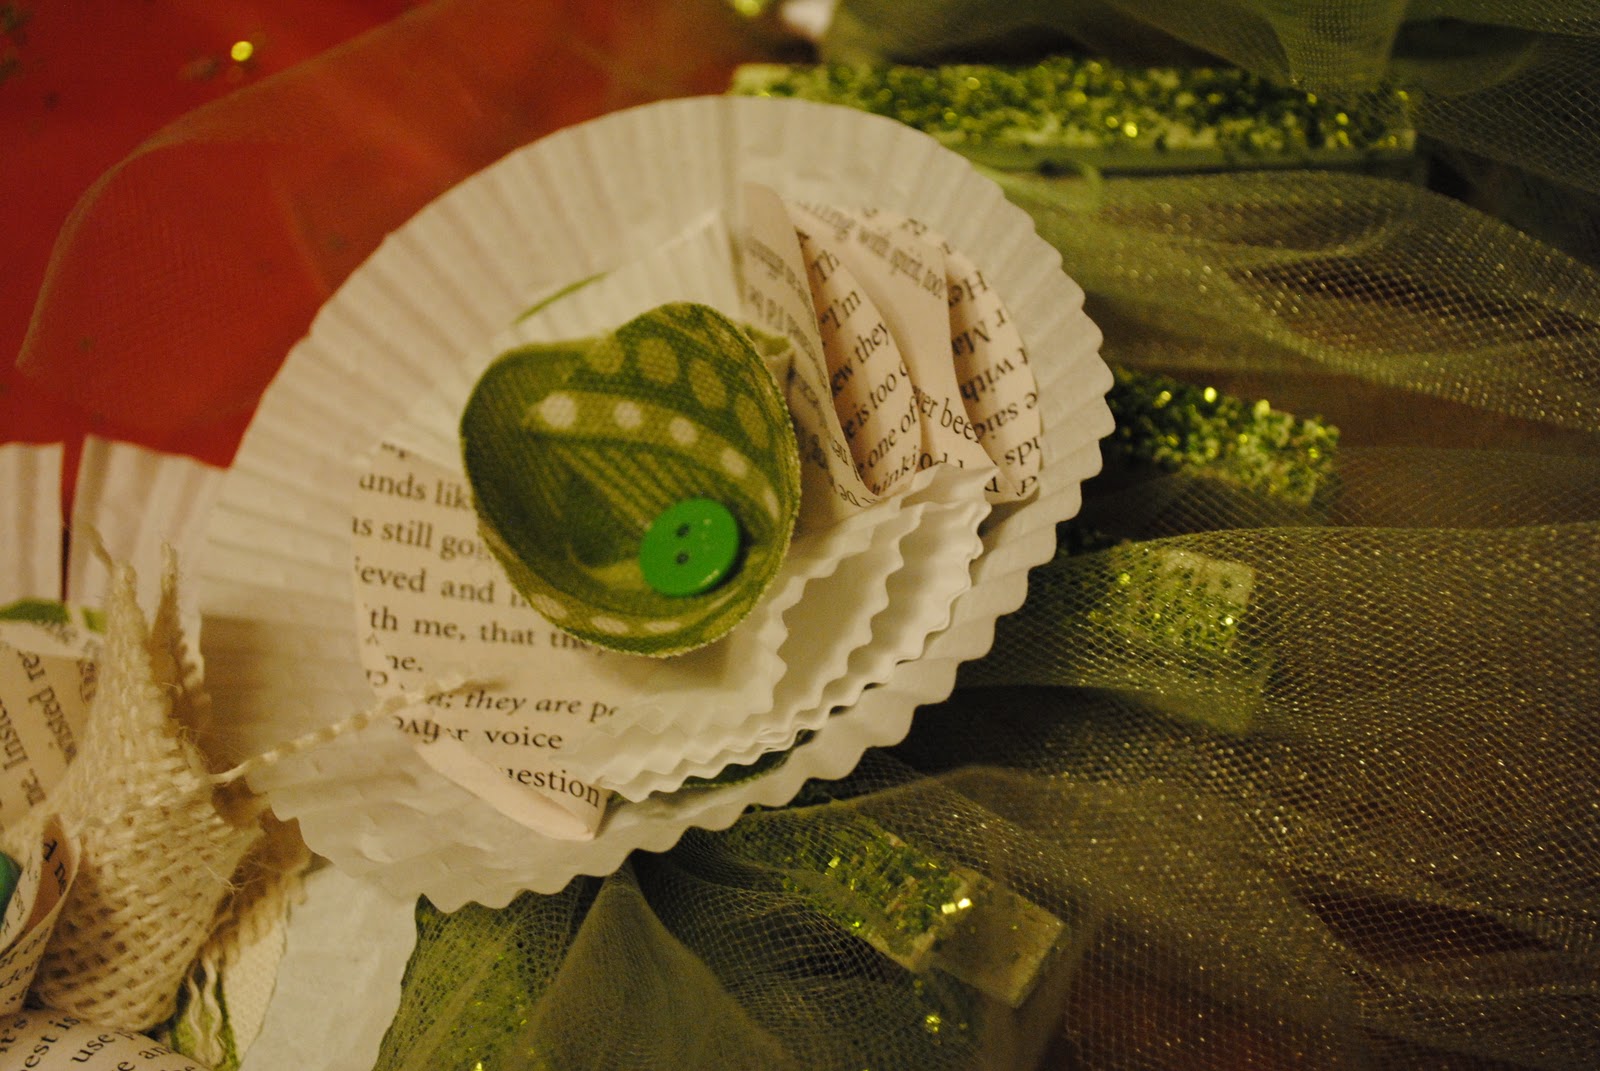
We don't have a tutorial for the embellishments, we just kind of layered some fun things and used wire to attach the "Lucky" label and hot glue for the flowers.

One crafter's idea was to pin the tulle down, in even rows, using the clothespins to hold it.  It made a cute ruffled look.


Here's another crafter's take: Lucky label in the middle!  Cute...


 Another crafters take (brilliant) on the flowers.  We loved these!  Dot needs to fix the example wreath now...


And a collage of the craft night.  Those strawberries in the bottom left picture were TO. DIE. FOR.  And they were just regular strawberries with some type of cream cheese topping (like fruit dip?) piped onto the tips.  I don't know the recipe, but that particular crafter better attend every month!


If you have any questions, please feel free to leave a comment, or email us at holidaysnob@gmail.com!

We've shared a link to this blog at:


Today's Creative Blog

Tip Junkie handmade projects

Photobucket

Holiday-to-go!


Who says the holidays have to stop when you leave the house? We say take them with you in your car! When you spend as much time in your car as we do you want it to have some of the same glam as your home. That is where holiday-to-go can help. It is a car charm  for your window to decorate for the holidays! Our Holiday to go kits come with 9 different vinyl charms that you can adhere to your window to sass it up. When the holiday is done you just remove it and put on the next charm.


PhotobucketTo order your Holiday-To-Go kit please contact us at: holidaysnob@gmail.com. Each kit is $45 plus shipping.

Subway Art to ward away pinching

Subway art is all the rage in the blogosphere right now, and lollyjaneboutique.blogspot.com
has this super cute St. Patrick's Day free printable for you to download and use right now!!
I know, I could hardly wait to send mine off to Costco--I will let you know tomorrow how
it turns out! And what a little sneak you would be to leave this on your favorite friend's door!

Photobucket

2.18.2011

Have my Rainbow Cake and Eat it too!


This amazing cake is from an art gallery party by One Charming Party but I think it would be so cute for St. Patrick's Day.  As you can tell, Dot and Glitta are a little obsessed with rainbows this year for St. Patty's!
Photobucket

2.17.2011

Hey Snob Sisters we want your ideas!

So many of our fondest and fave memories of the holidays are shared by our friends and family. We take inspiration and ideas from each of you everyday. So we are calling all of our snob sisters to please share your Holiday Faves with us. We just celebrated Valentine's day and we know there are loves to be shared. We have St. Patrick's Day right around the corner and I know my house is not the only house that those crazy little leprechauns visit. Then Easter...ahh that also means spring is on its way. That can't be soon enough in my book. So what we want to do is have you email all your fabulous pictures, traditions, recipes etc... to holidaysnobs@gmail.com. We will then post our favorite valentine's day treats on March 5th. Then on March 10th, we will post our St. Patrick's Day chaos. Then on March 30th, we will post Easter ideas from all of our friends and family. Can't wait to see!!


Photobucket

Who said green looked good on everybody?


We thought it would be fun to feature a photographer each month presenting a holiday themed photo shoot for you to do at home with your kids. Clearly, a pro is the best, but its fun to have a few holiday-themed candids on display too!

This month, in honor of St Patrick's Day, our guest blogger is Melissa from Blue Prints Photography.   You should definitely check her blog out! Melissa had this super fun idea to do for your St. Patrick's Day photo this year that will help answer the question, feelin' green? Not really....

Melissa writes:

For Saint Patrick's Day this year, ditch the traditional green and go for a rainbow-themed photo shoot with your kids! If you don't have a rainbow dress like the one pictured, don't worry! You can create your own rainbow effect by dressing up your child in purple socks, blue shorts, a green shirt, yellow scarf, and an orange or red hat. Or, if you have several children, spread the rainbow out over all of them! Most importantly, just be goofy and have fun!


I am picturing my girls wearing a mix of reds and orange and purple and yellow and my son in blues and greens all in a row to make my own little rainbow of love---hopefully I can get the perfect shot before the rainbow starts pulling hair and pushing!!! Wish me luck...the Irish kind!

By the way, if this post inspires you to take some fun rainbow pictures, 
or have Melissa take them, let us know!  We'd love to see them!
Photobucket

Somewhere over the rainbow you are sure to find these little cuties!

IMG_9179.fixed


Words do not do justice, do they? These pictures actually caught my breath and then I said, "Oh my word, can I live in this home where they serve rainbow pancakes?!" But that is what is so sweet about i am mommy, she passes along all of her wonders so we CAN all live in a home with rainbow pancakes! I am so excited!


IMG_9023.zapcooler
Yes, that is pancake batter.  Now.  There is no need to silently nod to yourself in victorious gloating satisfaction because (hanging head)... you were right.  I am obsessed with food coloring.

Food coloring and making my kids happy.
Picnik collage.rainbowpancake

IMG_9179.fixed Photobucket
Related Posts Plugin for WordPress, Blogger...